 |
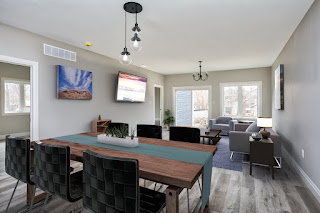
| Example of virtual staging 3d software output before composited onto a real scene. |
7 Step Easy Virtual Staging Breakdown
That's it, I'm doing it. Blowing the lid off the virtual staging shroud of secrecy. Real estate photographers and probably some agents want to know, and I am here to tell you.
In fact, I plan to teach you how. It's really not as hard as you might think.
In fact, I plan to teach you how. It's really not as hard as you might think.
 |
| a virtually staged living room photo for real estate client. |
The better you know something the easier it is to each it, and with technology, the longer you wait, the easier it becomes to use and access relatively new features. In the case of virtual staging, that newer feature is 3d rendering. Photorealistic 3d renderings. Sure it's been around more than a few years, but it's never been more accessible to consumers. Anyone with a computer that can edit video, or play a semi-recent video game can do virtual staging, and charge for their services online.
1. The Computer
The computer is important for this method. So while you may have to shell out a bit for some better hardware, rest assured, there are a lot of open source pieces - aka 'free' - things you get to use along the way so it's cheaper than lets say your Adobe CC Photo Subscription for instance. Any computer that can edit a video or play a modern-ish video game can work in 3d for these purposes. You want a lot of RAM, a multi-core processor and the biggest beast of a GPU you can afford or your machine is compatible with. | |
|
The software is one of those open source pieces we talk about. It's called blender3d. It is wildly capable. Honestly. If you see me mention this software anywhere else online, I'm probably ranting and raving about it. Get it. Learn it (spoiler alert, this is the hardest part!!). The software is still only the tool that let's us exact our creative powers over the image. Then in addition to your specialized and complex 3d software you should have a intermediate understanding of photoshop type software using layers, blend modes, brushes, opacities, and masking.
 |
| what the 3d output layer would look like before it's composited. |
3. The Software, part deux
This should be it's own section. Not exactly software, pretty well everything happens in blender mentioned above, but you still need furniture items. Those furniture items are delivered as software instructions that blender understands including a mix of still images (textures like wood grains, or roughness patterns), vector geometry that describes the shape in three dimensions, and then node set ups which tell the texture how to wrap onto the object, and how light should act when it is hitting it which is ultimately, how our eyes and brains decide what an object is actually made of without touching it. You can find furniture for free, but generally, your images will look worse with bad furniture, and the good furniture is worth having if you plan to make a real go at this. |
| an exterior view of a home that originally was photographed without landscaping and a container bin blocking the attached unit's garage. |
4. Camera Solving or Matching
This is the process of making the 'camera' that renders your 3d image takes on optical properties similar to the one that captured your real empty room photo. There is an add-on for blender called BLAM! which is no longer active since Blender 2.80, the functionality was built straight into blender menus, now we have fSpy. Which works simpler, but less convenient to integrate into blender sometimes. |
| Getting the scale and depth of a room is crucial when scenes span a space this size, with objects near and far to the camera. |
5. The Creative Part
This is the most creative part of the process. Picking the furniture, and laying it out within the space. Anything you have sourced as a photo real 3d model online will work here. The hard part of this stage, when you move forward, is the management of your digital assets in an easy to access framework. A library of your furniture. Your own workflow here will depend on how much of this you want to do and how you intend to go about the planning phases with clients. I'll share more in depth ways of managing your assets in an upcoming youtube video.
One of the most amazing parts of the 3d aspect, is if I have a kitchen table and it has a dark stain on it, but a lighter stain would look better in this space, I can relatively easily change that. Your color harmonies are limitless in 3D in a way that isn't possible in real life without much more time, or much more resources traded for time.
Obviously, this is the part I get most excited about. It's great to see something empty start to look inviting.
 |
| Pre-visualize renovations of any size. This is a recessed shelf in my home I am planning for awkward shaped camera and network equipment. |
6. Lighting it
After positioning the models in place, your last, most crucial step is to light the scene. Which really means putting ceiling lamps in 3d where ceiling lamps are in real life, and where windows are in real life, with qualities of daylight or other sources transcribed into 3d software terms. And with light comes shadow, equally important to seeing where light is, is seeing where it isn't. We have special "shadow catcher" objects set up in our scene to capture the shadow that would fall on the floor from a stool, and adding that shadow to the existing floor captured in the real photo. |
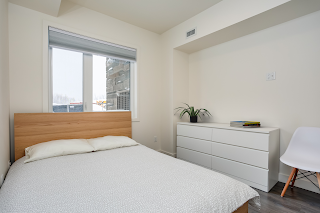
| a virtually staged bedroom. This original photo is an empty room with two windows and a door to the ensuite |
7. Compositing
The final step, compositing your 3d outputs onto the real photographs. I've got extensive background in photoshop type programs so I use them. Pixels are what I know best and feel most comfortable in. So I composite in that software. However. If you're learning, compositing directly inside of blender is actually equally feasible and likely much more powerful - I can't say because I haven't composited enough in Blender to understand it's potential. Ultimately, this is the final step. You meld the digitally created world you've made with the real world you or someone else photographed. Once this stage is complete, it can pass for and be used as any other jpeg off your phone or camera would.
 |
| rendering before and after : we added the black slat cladding on this exterior modern home to show what the house might look like finished, for sale with buyer's option of finish. |
Transitioning Work through Covid-19
If that is sounding complicated, it is a bit at first. All of 3d work is to an extent but as a photographer, especially real estate photographer, you can be well equipped to make a transition into understanding 3d, at least at a level required to do your own virtual staging when other, more local work may not be available - as is the case right now with the Coronavirus causing chaos in all markets across the world. This is just one approach I am considering to augment my existing services with for moving forward in this era.Virtual staging is a good skill to pick up in this time of #stayhome now more than ever. It is expensive on time, and relatively cheap on capital. Conveniently (silver lining here under circumstances) a lot of people have a lot of time, and a dwindling supply of capital. So it's a great fit.
 |
| a kitchen view with a number of added pieces included appliances. |
Applications
While some of the examples and explanations may seem a bit narrow, the skills you learn with 3/4 of this work outlined above, will apply to a variety of fields on a much more broad spectrum.- Virtual renovations and pre construction. Take floor plans and show what a finished and furnished room might look like. Help people choose a wall paint color. Help people choose their marble counter top look. These types of images are used in marketing new homes and developments all the time. This specific line of work is called architectural visualisation or Archviz for short.
- Vacant land. I might work with a lot of partially finished homes for these cases, but what if you want to show a new development of homes, or even just the plan for a single home with landscaping on a vacant lot with a view? 3D is one answer
- Ultimately, you can take this as far as you have motivation and drive to do. These skills translate directly to concepts you'd need to understand for compositing green screen footage with hollywood actors in the latest action blockbusters. Let's not get ahead of ourselves though, that's like flying the biggest Boeing when you're just learning a tricycle.
 |
| test a new layout plan for your renovation, or visualize your color harmonies and material choices. |
At the time of writing this, I've completed about a dozen simple 3d render jobs for clients and looking forward to more. It took a number of practice projects in my free time to get the understanding needed to be able to offer professional work. And very important to mention, also maybe comforting to hear, in case you're worried; before a realtor that I work with uses virtual staging, they'll always be clear in disclosing that with the listing. Even though it's not furniture included in the sale, it's wise to mention for anyone's situation.
The Rug
The rug is important in virtual stages. You'll see it often actually. Why do we do this? Well we actually need to control the glare on a floor anytime you shoot toward a window. It can be one tell tale sign that there are forces at work that trick your brain. It's a hard set of conditions to describe, but if you see a reflection of a window on the floor, when there should be furniture in the way of that reflection, while you may not be able to put a finger on it, you will be put off by it.
The best way to learn something as visual as virtual staging is to show you. So while the video isn't quite ready yet, head over to www.youtube.com/cgardinerphoto and subscribe to catch the video as soon as it's published!
Looking for other recent photos and short clips? Visit instagram
check out my instagram accounts @cgardinerphoto and @aerialmedia_gardiner for the very latest of what I find interesting.You can watch more videos too
Everything from real estate tours, how-to walkthroughs, photography gear reviews, software demos, and more. Visit my youtube channels to see the latest Chris Gardiner Photography in Collingwood on YouTube Display Ads Help Support This Blog. Thank You for Understanding!See More
There are even more places to see the my work online. For Collingwood locals, where Chris Gardiner Photography now also calls home, we've started the Photograph Collingwood Blog, a destination online to highlight the beautiful known and not-so-known locations in Collingwood and Blue Mountains.